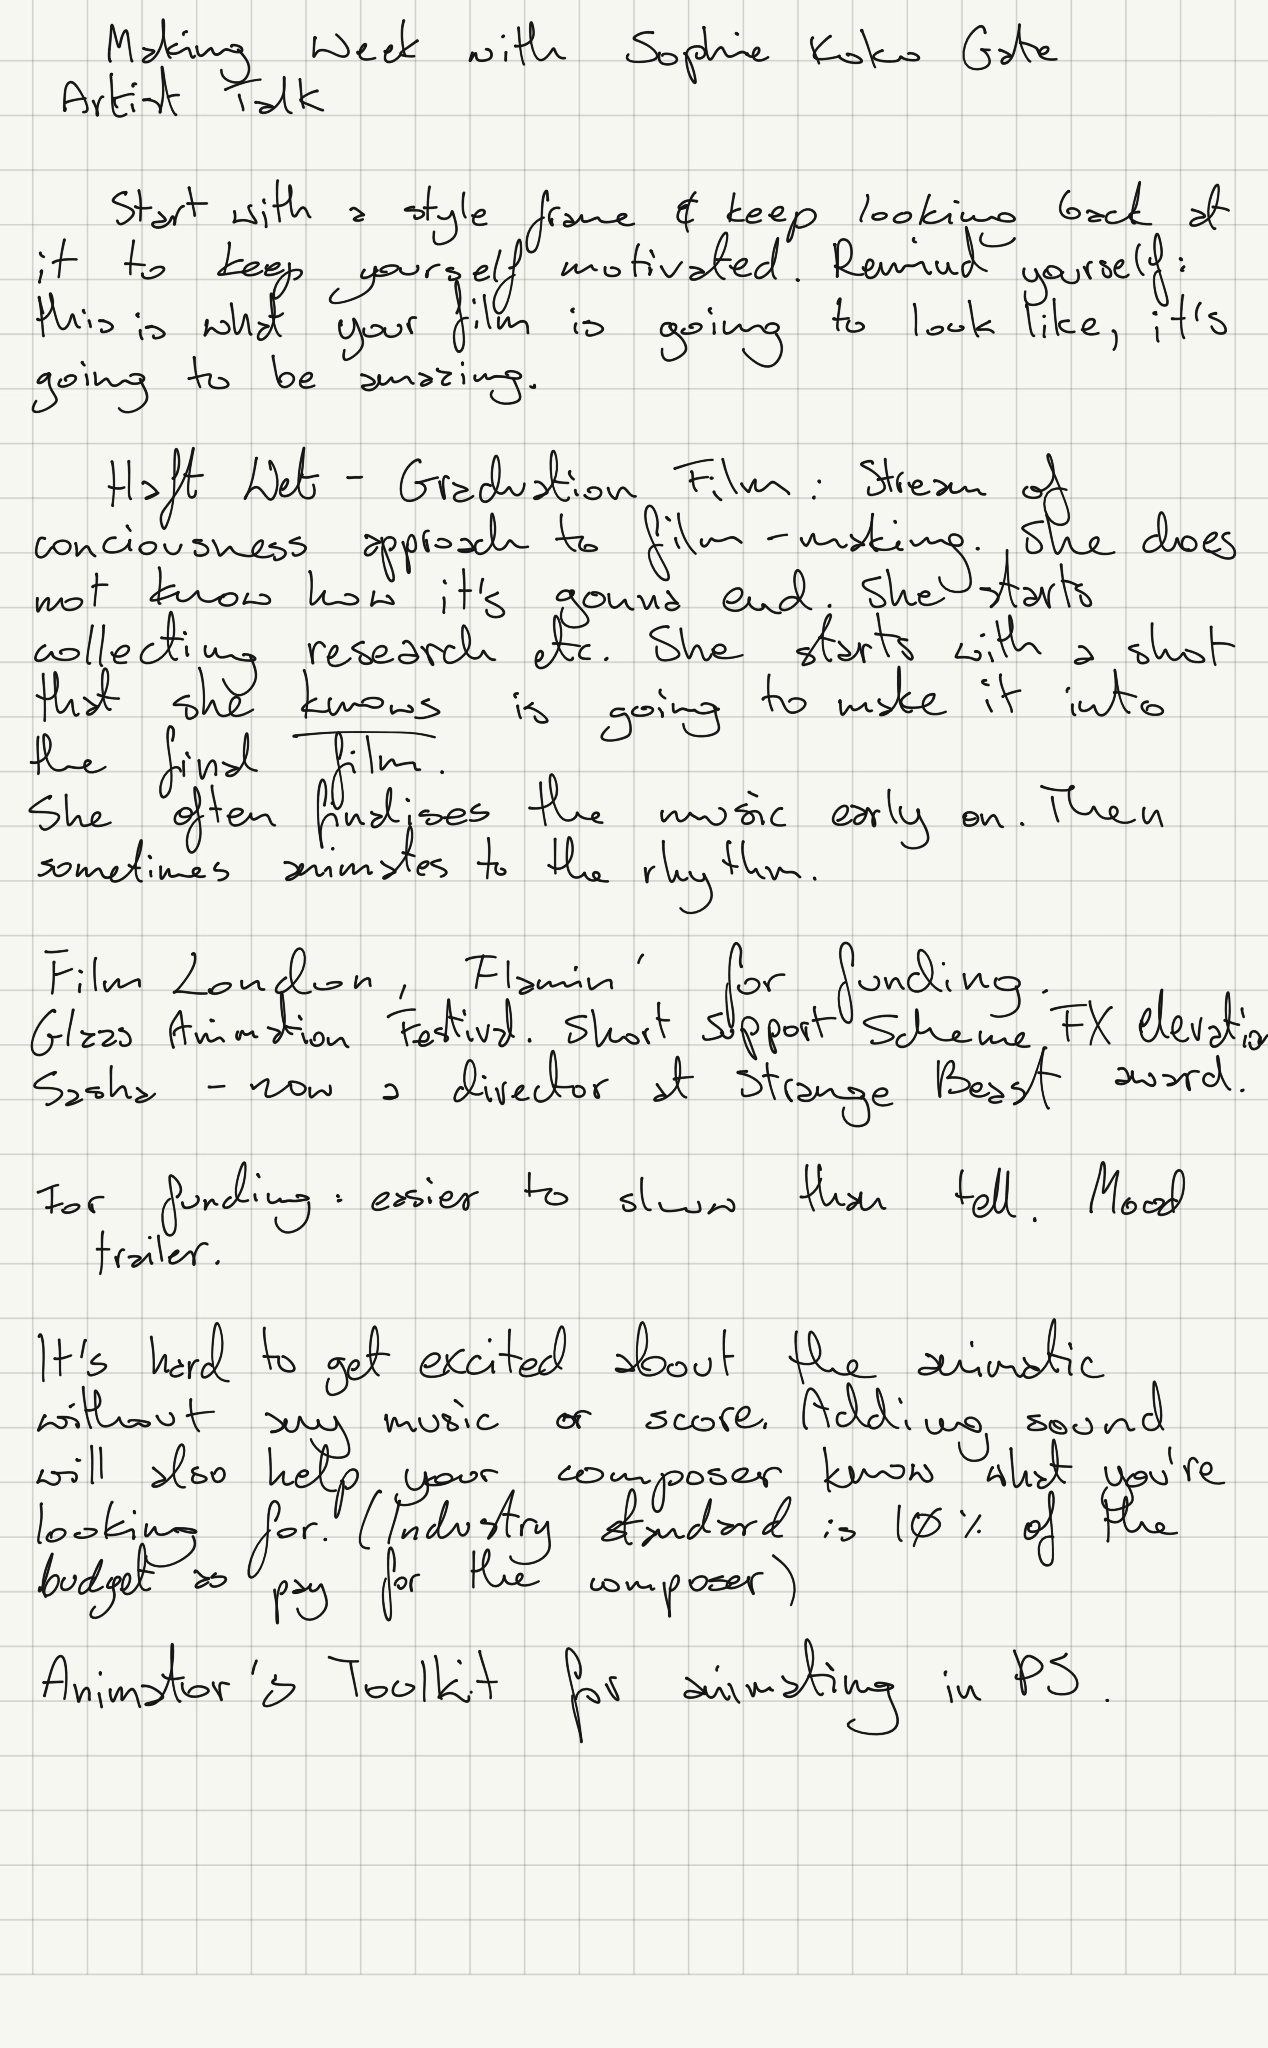
The Making Days with Sophie Koko Gate were really inspiring. I was previously not a fan of animating in Photoshop, however, it’s the main program she works in and I was willing to give it another shot.
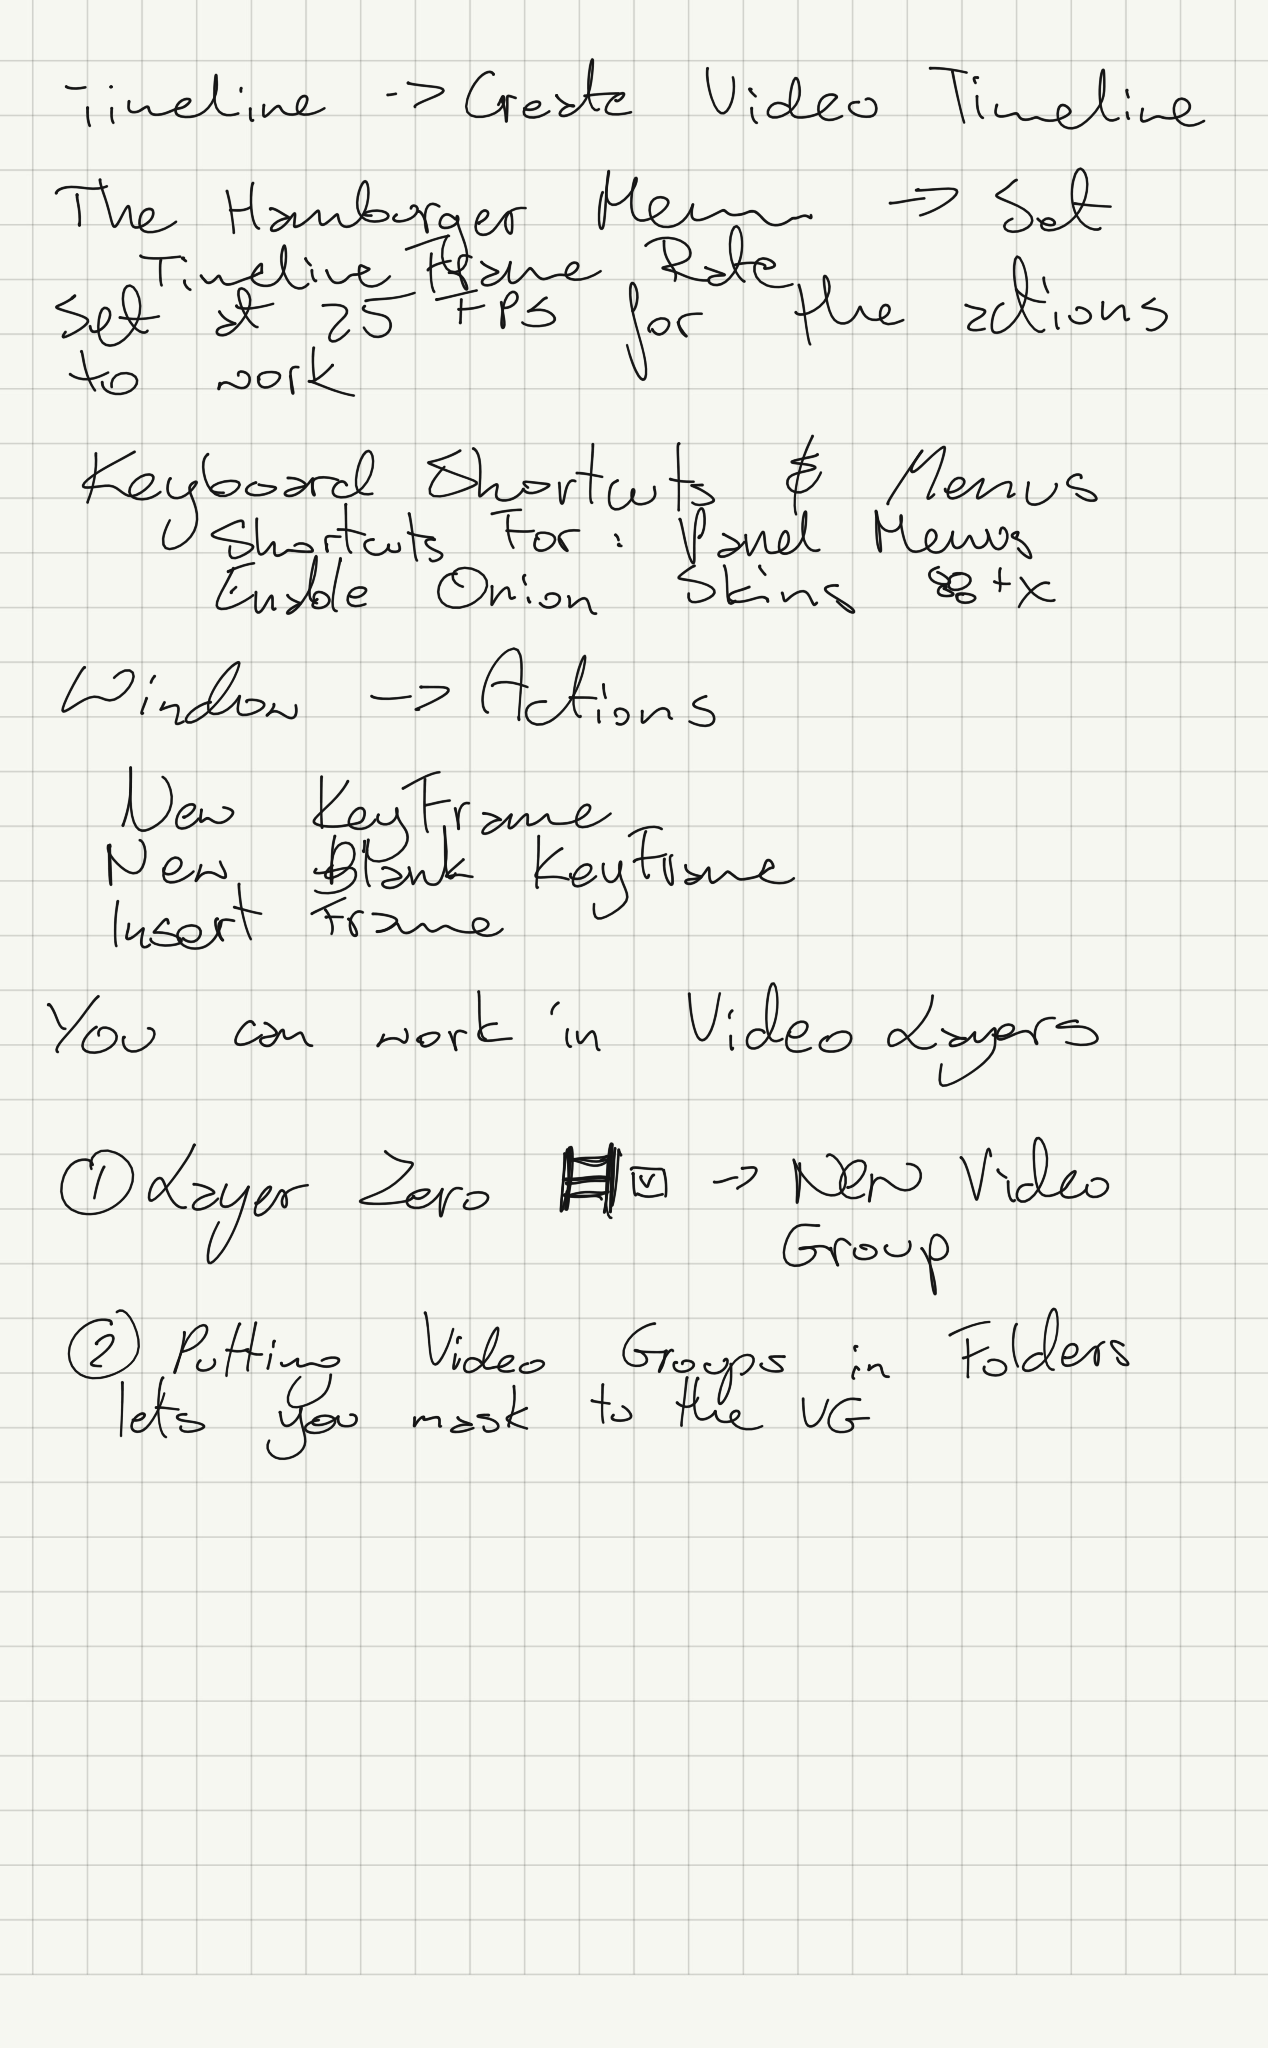
She gave us a lot of useful hints and tips, as well as Auto Actions which made making New Frames and Filling Lineart much more streamlined.
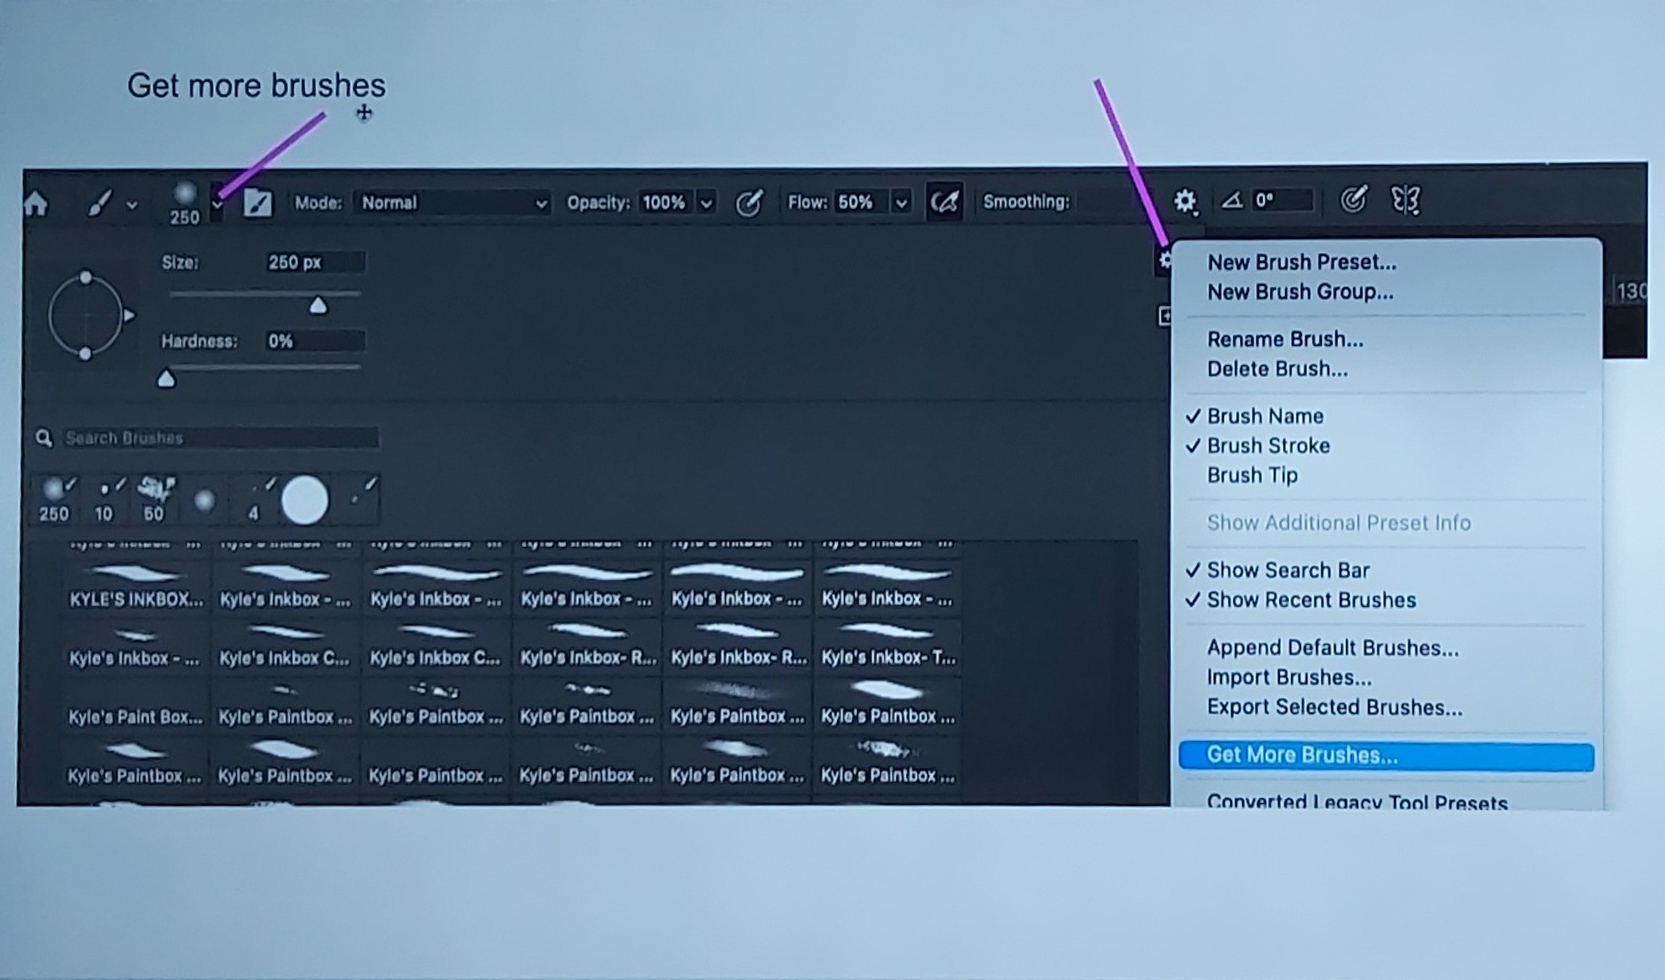
I do enjoy Photoshop in general as an art program and I really like how easy it is to alter and add new brushes. The biggest difference to me is the fact Photoshop doesn’t ‘cut-off’/’crop’ drawings when moved outside the canvas, as well as its transform and liquify tools compared to TV Paint.
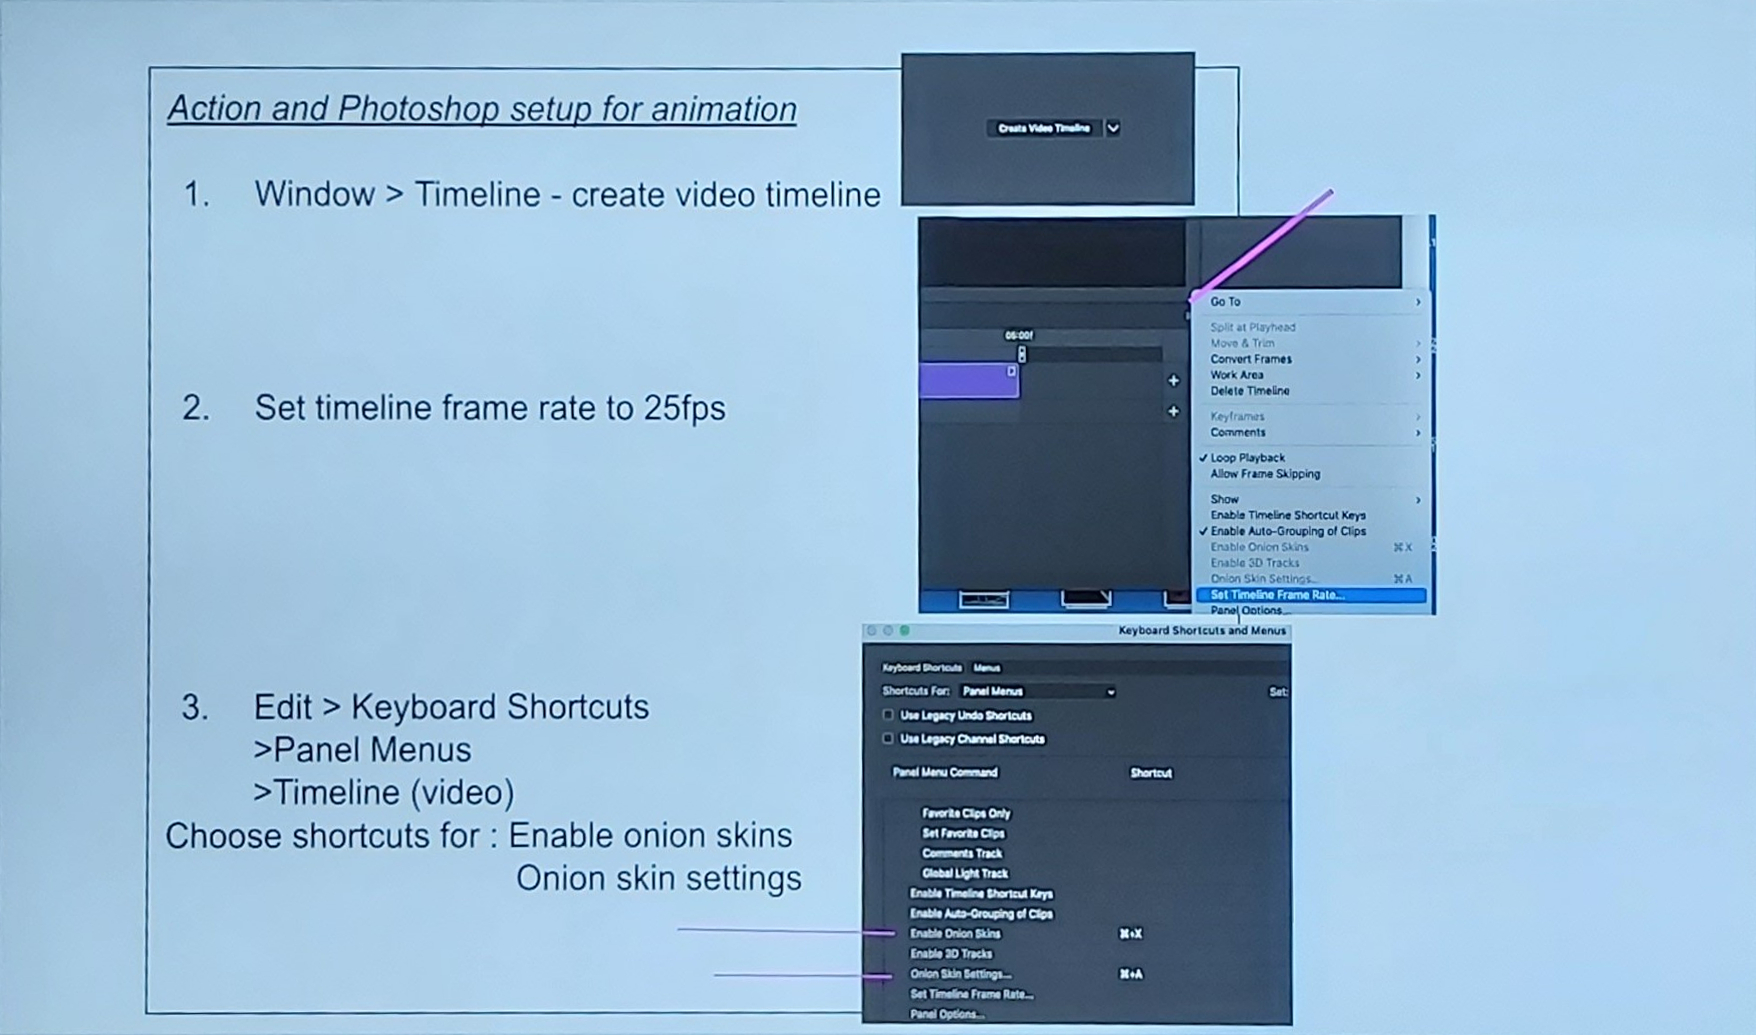
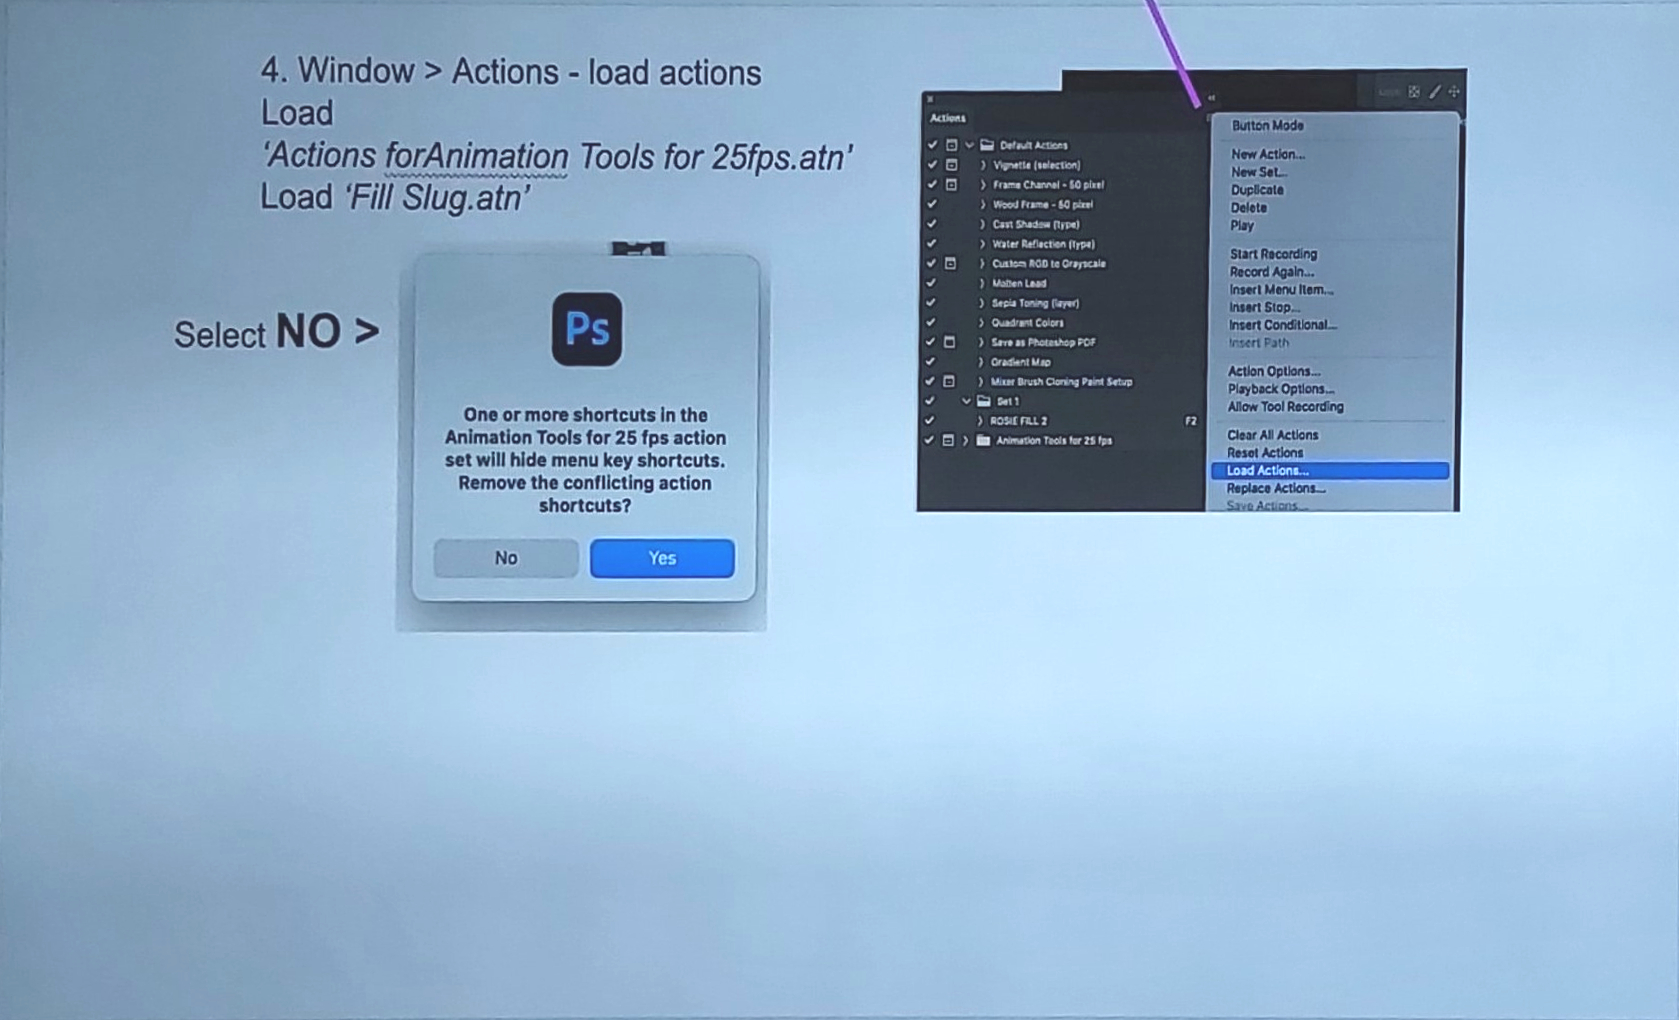
Sophie was kind enough to share the steps for setting up our Photoshop workspace.
Here are the shots I completed during the two days. Again, I found it really helpful to be able to transform the lines in the way I was used to from illustration work.
To prepare myself for the graduation film, I watched Howard Wimshurst’s short video and took notes. While I knew most of these tips, it was good to get them reiterated. I also highlighted what I found to be especially useful:
Watching his video definitely made me much more excited to get started on the animation. Next up, I will be looking into case studies of studios I’d be interested in working at – I will be looking at the styles they use in their animations, and perhaps how to adjust my film to make it relevant to them.
Victor, Marco, Neale, Rebecca and I entered a 24 Hours Animation Contest for Students. In short, we had 24 hours to create a short animation for the “imagining the future” theme. The theme was announced at midnight, and we had until the following midnight to come up with the idea, script, storyboard, animate, and composite a short 30-second film.
We followed the theme of radiation that killed animals on earth, leaving humans to exploit cockroaches for their milk.
I had a great time organising the team and taking care of the production, as well as clean-up and colouring, and designing the milk carton. As production is definitely an avenue I’m interested in pursuing, I was glad to have a chance to be responsible for keeping track of everything.
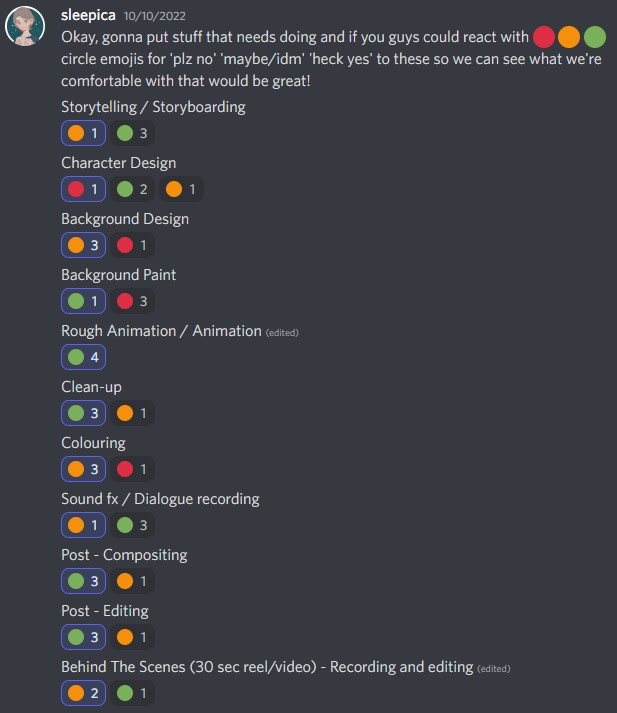
Before the contest started, I organise a whatsapp and a discord group, including a system to figure out who was happy doing what, as I wanted us to use our strengths and learn from each other.
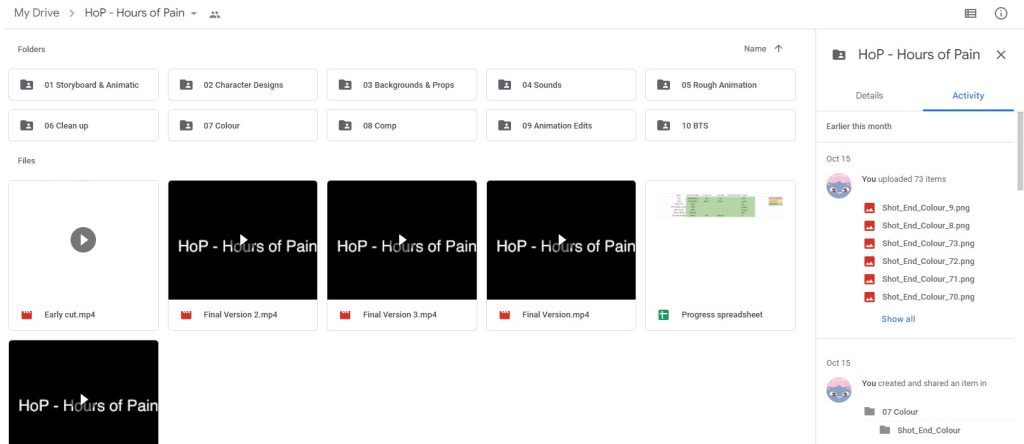
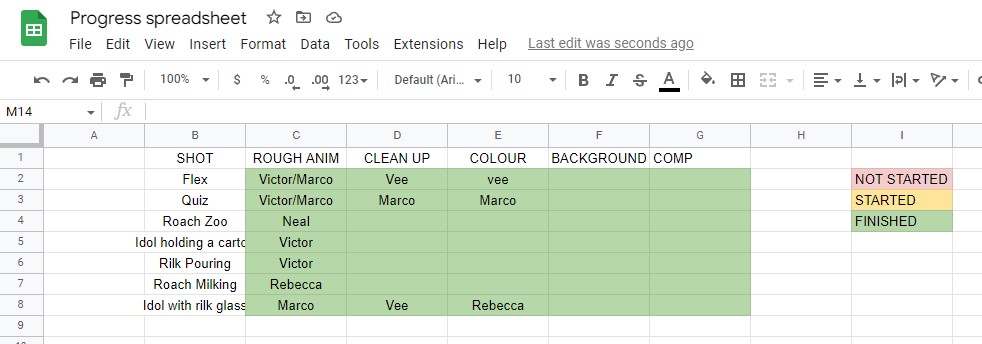
I also organised folders in an Online Google Drive so that we could all share the files as needed, and it doubled up as a backup. Additionally, I created a simple spreadsheet to track the progress and divide the work when needed – due to the nature of the contest, I didn’t want to spend too much of my time on this.
Different production tasks. Click to see full image
This was the first time our school entered the contest in the 20 years it’s been run. And the results announcement happened a week later, on the 21st of October… And…
Drumroll, please… We came 8th!!! Honestly, we couldn’t believe we managed to place in the top 10! It was a little disappointing, as only the top 5 get prizes (so close-) but still! The experience was absolutely wonderful and, actually, not as stressful as I imagined it to be. We all worked together really well and trusted each other to do our job. Teamwork truly makes the dream work.
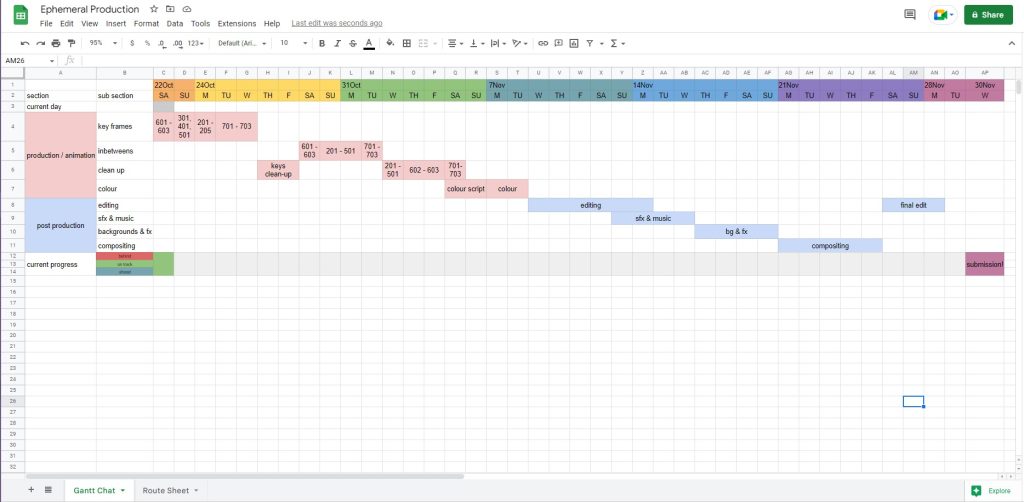
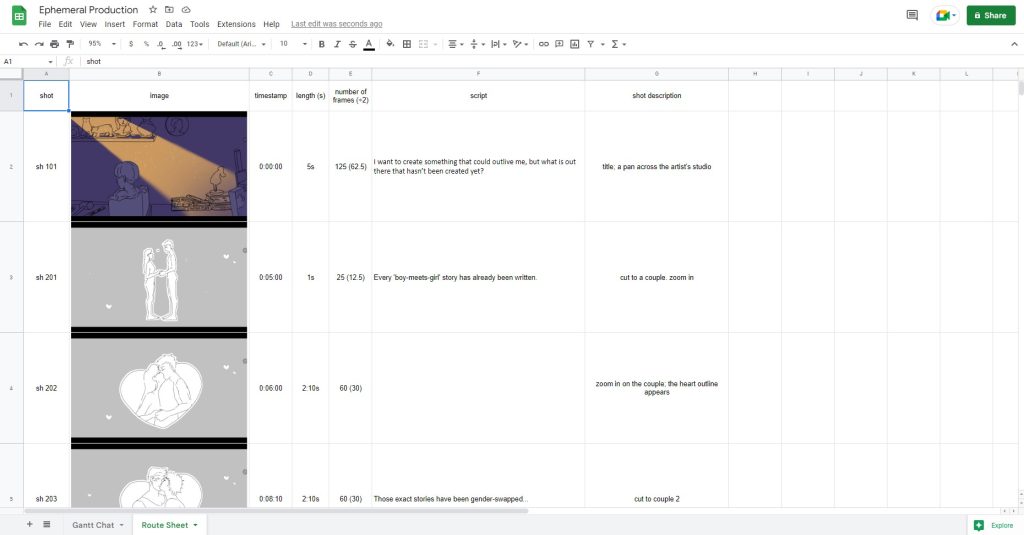
Today we had a meeting with Ko about Production and tools that will help us keep on track. We’ve learnt about Gantt charts and Route Sheets, both of which I found extremely helpful. And the more complicated the animation is, the more helpful they are. As well as this, these are extremely important if other people are going to work on the animation – especially to endure clear communication or when dividing the tasks.
I have put both the Gantt Chart and the Route Sheet into the same Excel document, so that I could keep them all together and not have a lot of the tabs open.
In today’s session with Shaun we looked at various artists who use animated character on top of live-action filmed / photographed backgrounds. Or who manipulate photographs into collages and rigged characters. I was particularly interested in Christoph Niemann’s (Abstract Sunday) work (below).
His work is simple, yet experimental and unique. The simple forms move in the real world and give a feeling of unease – because they don’t belong. But at the same time look sort of quirky for the exact same reason. They’re familiar to a human figure, yet so different – doing things a person would, yet in such non-human-like ways.
His work very slightly reminded me of doodles where arms or eyes are added to animals, or inanimate objects, or of Jeremy Nixon’s work.
Given half an hour to film the scene to work with, I quickly drew a bath – I knew I wanted a simple, calm scene that I could easily finish during the 3 hour lesson. (I used Listerine for colour, and washing up liquid for foam. Also, cold water trying to waste as few resources in the moment – in the future I’d hate to waste water, so perhaps I would film similar scenes when actually making a bath for myself).
The footage ended up a bit shaky, unfortunately. Personally I didn’t like it and re-shot the scene, but Shaun showed me how to track and parent footage, so I could work with it if I ever run into a similar problem in the future.
I normally don’t like filming out and about without a tripod, but now I feel like it wouldn’t be that much of an issue. It could even add more authenticity and interest to the animation, if it ‘shakes’ along with the footage.
I began working on the short animation, which took longer than expected as I ran into some trouble with Animate CC (my brushstrokes were disappearing, but reappearing when I moved the frameback and forth) despite trying to troubleshoot, the only thing that worked was restarting the program.
Despite this, I persevered and got a simple animation done. I’m actually really happy with how it came out, as i feel it would work well as a looped gif or video. I really like the nose sticking out, as I think it’s a little detail that adds personality to the character.
It still seemed a little bit flat, though. And so I’ve decided to record some water, foam and splashing sounds.
Once everything was put together, I am actually very happy with the result. The animation is actually quite personal to me, as I find bath time and sounds of water relaxing and something I often look forward to after a long day.
I think it’s a successful piece of work and it let me explore a new style that I didn’t think was ‘for me’ initially, but that I actually grew fond of and heavily enjoyed working in. Most likely for the same reason I was drawn to Niemann’s work – the weirdness yet familiarness of it.
I think if I explore this further, I would like to add different actions / scenarios – where maybe the character blows a bubble, or swishes their hand in the water.
Today we looked into animating using Adobe Creative Cloud Animate. I find it’s quite different from TV Paint, but because it’s vector-based, the lines and shapes can be resized without losing quality. We started out by creating a character inspired by the shape of an item we had around us. I had a pepper grinder on my desk, so I used the textures and shape of that but turned the peppercorns into gumballs. The character’s name is Pepper in homage to that.
Next, we looked into frame by frame animation within CC Animate. The Onion Skin is a bit more confusing than TV Paint, but it’s much more accepting of copying and moving items within frames. I decided to just animate one of Pepper’s gumballs, as I wanted to keep it really simple and just familiarise myself with the program.
We also looked at turning animations into Symbols that could have been animated further via tweening. One mistake I did was turning the frames into a Movie symbol. It’s really important to turn them into a Graphic symbol, so that the animation is preserved. I know the highlight wouldn’t have moved, but I’ve done it for the purpose of the exercise and I really like how it turned out actually.
I think this might be a good way to animate the mood walk change, but I’m not sure how to time it right. So it might be something I will explore.
Making a horse walk is much more complicated than I anticipated. I had a hard time getting my head around the concept and would definitely be unable to animate one without a reference. I found that animating the back legs first, then going back to animate the front was more manageable than doing all of them at once.
It’s currently animated on threes, but I might add more in-betweens to take it down to twos. I also need to add a tail.
As per Steve’s feedback, I might make the neck move more. And also need to ensure the steps are the same size. The lines can be simplified – the less the better. And the legs that are further away, can be higher off the ‘ground’ due to perspective.
A little animation of a Soot Sprite from Spirited Away to get more accustomed with the tools. It can definitely be improved as per Steve’s revisions – the arms seem too long in a couple of frames and should be adjusted.
This was my second attempt, this time with Sandshrew – whose design is similar to the armadillo, hence the rolling up. As per Steve’s revisions, I would like to work on the tail more and add slight squash.
Getting to know TV paint and the states of matter! Important things to consider when animating an inanimate object? Weight (how heavy? how quickly will it fall?), Environment (is it in water? is it sliding?), Solidity (will it squish and stretch?), Force (is it being thrown? launched from a cannon?), and Construction (is it a soft balloon or a solid box filled with water? is it a feather that floats in the air or solid ball that falls straight down?).
Work space~
Taking videos gave me a greater idea of what to look out for and was a great reference.
Rolling a beach ball off the incline
Here are some examples of work I’ve managed to complete while getting more familiar with the program:
I’m quite happy with them, but I think I can still work on my timing and get it better. These are animated on twos.
I also experimented with getting Clip Studio Paint to work as my animation program, as I am much more familiar with it and it has a number of brushes that make life much easier.
Clips Studio Paint workspace
I found it quite straightforward as I was already familiar with most features. Perhaps I could use TV Paint for story boards and timing, then finish it off in CSP if I were looking for a more painterly look, as I’m unsure whether that’s possible in TVP… There’s still a lot to learn!